Latest Article Get our latest posts by subscribing this site

Cara Menghilangkan Tulisan Tampilkan Posting Dengan Label

Kalau sobat blogger menambahkan widget label di blog sobat, ketika salah satu Label di klik oleh pengunjung, maka akan muncul sebuah teks yang bertuliskan Showing Posts With Label . . . . . Show all post di bagian atas blog post.  Kalau blog yang menggunakan Bahasa Indonesia, bukan teks "Showing Posts With Label . . . . . Show all posts" yang muncul tapi teks "Tampilkan posting dengan label .... Tampilkan semua posting". Dalam dunia blogging, teks tersebut lebih populer dengan sebutan Status Message Bar.


Banyak orang beranggapan bahwa Status Message Bar membuat blog tidak terlihat professional, tidak keren dan tidak rapi, oleh karena-nya, saya akan berbagi trik blogspot tentang cara menghilangkan tulisan Tampilkan posting dengan label.

Ada dua langkah atau ada dua cara yang bisa dilakukan untuk menghilangkan tulisan Tampilkan posting dengan label yaitu :

  1. Dengan Menambahkan kode CSS (Tanpa Edit Template)
  2. Dengan menghapus kode Status Message (Edit Template)

Dari kedua cara tersebut, mana yang sobat blogger pilih? Sudah pasti sobat blogger akan memilih cara yang termudah yaitu cara pertama (Tanpa Edit Template). Bagaimana cara menghapus tulisan Tampilkan posting dengan label tanpa edit template? Ikuti saja tutorial blogspot yang singkat di bawah ini.

Cara Menghilangkan Tulisan Showing Posts With Label

  • Sign In di blogger.com
  • Pada menu drop down, pilih template
  • Klik tombol Costumize
  • Klik Advanced dan klik Add CSS


    • Copy Paste kode berikut pada kolom yang tersedia
    .status-msg-wrap{display:none !important;}
    • Terakhir, klik Apply to Blog
    Apa kerugian dari menghapus Status Message Bar di blog? Kerugian dari menghapus Status Message Bar yaitu tidak munculnya atau tidak tampilnya pesan error 404 yang sudah sobat blogger buat. Lho, kenapa pesan error 404 tidak muncul di blog? Karena pesan error 404 termasuk juga Status Message Bar.
     sumber:
    http://www.tutorialblogspot.com/2012/09/cara-menghilangkan-tulisan-tampilkan-posting-dengan-label.html

    Add Facebook Recommendations Bar To Blogger

    Can it increase your traffic?

    Oh sure yes without any doubts! We often share widgets but we don't implement every plugin on our blog unless it provides some value to traffic or revenue. As you can see we have added the recommendations bar on all our posts and this will surely put a positive effect on pageviews because now visitors can see what their friends previously liked on your blog and due to a human curiosity they would surely check these extra posts along the way that appears under the Label "You Might Also Like". Google Plus button shows friends recommendations in search results and Facebook Bar will display the likes on your blog. Thus consumer of all such plugins is always in benefit.

    Install it on Blogger

    It can be installed easily on both BlogSpot blogs and Wordpress but with a little patience. We have kept the installation extremely easy and ignored unnecessary steps like installation of Open Graph Meta Tags. We would install necessary codes to keep the structure clean and make the widget work just fine. The code we are sharing is optimized and will display your blog titles and featured images correctly and with a lot of control attributes.
    Follow these easy steps:
    Step1: Create a Facebook Application
    For this plugin to work you will need to create a Facebook App in seconds. The below method is the standard and correct method for creating any FB App you like.
    1. Log into Facebook Apps
    2. Click on Create New App button towards Top-rightcreate new app
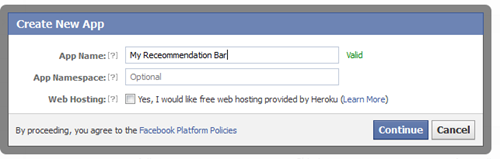
    3. In the box that pops up, type "My Recommendation Bar" inside the App name field and leave other options as default. Click continue.
    app name
         4.   Enter the captcha security code. Click Submit
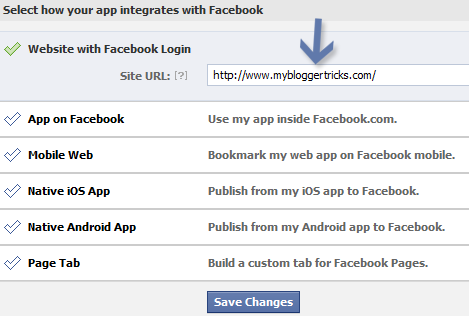
         5.  You are app is almost complete. Just click Website with Facebook Login tab and inside the box input your blog URL. See the screenshot below. Do not touch remaining options and click Save Changes.
    Site URL
             6.   You will see two strings of alpha-numerical characters. One is App ID and the other is App secret. Just copy the App ID code and keep it save in a notepad. We will need it later.
    App ID
    Congrats App finally created! Lets proceed to step2.
    Step2: Add "Recommendations Bar" To Your Blog
    Follow these steps to add the bar to Blogger:
    1. Go to Blogger > Template
    2. Backup your template
    3. Click Edit HTML > Proceed
    4. Search For this :
    <html
    Replace it with this code:
    <html xmlns:fb='http://ogp.me/ns/fb#'
    This will make the plugin compatible in older versions of  internet explorer also. Since blogger templates are coded in XML therefore inserting this XML namespace will enhance the plugin performance and compatibility.
         5.   Next search for <body>   and just below this tag paste the following code:
    Note: If you are using the new blogger templates like Simple, Awesome Inc., Travel, Watermark or Picture window then please search for <body instead. Make sure to paste the code below the entire body tag.
    <div id='fb-root'/>
    <script>
    //Facebook Recommendation bar by www.mybloggertricks.com
    //<![CDATA[

    (function(d, s, id) {
      var js, fjs = d.getElementsByTagName(s)[0];
      if (d.getElementById(id)) return;
      js = d.createElement(s); js.id = id;
      js.src = "//connect.facebook.net/en_US/all.js#xfbml=1&appId=
    ***************";
      fjs.parentNode.insertBefore(js, fjs);
    }(document, 'script', 'facebook-jssdk'));

    //]]>
    </script>
    <b:if cond='data:blog.pageType == &quot;item&quot;'><b:if cond='data:blog.pageType != &quot;static_page&quot;'><div style='z-index:999999; position:absolute;'>
    <fb:recommendations-bar action='like' max_age='
    0' num_recommendations='3' read_time='10' side='right' site='http://www.mybloggertricks.com' trigger='40%'/></div>
    </b:if></b:if>
    You are almost done. Make these changes:
    • Replace *************** with your 15 digit App Id that you saved in step1.
    • Replace http://www.mybloggertricks.com with your blog link
         6.   Save your template and you are all done!
    Visit your blog and scroll down about 50% of your page and wait for 10 seconds for the plugin to expand. Enjoy the new way of free pageviews juice! :)

    Optional Steps

    Below are optional customization and control options. You can skip them if you want
    • max_age: will decide the age limit of articles. Sometimes you don't want to display too old articles so you can set it to display up to 1-180 days old posts. But if you don't want to take age into account then let it be 0 as default.
    • num_recommendations: You can set how many articles to display. By increasing or decreasing the value 3
    • read_time: As soon as the user reaches a specified location, the plugin would expand and before expanding it will take some time. I have kept it equal to 10  seconds, you can increase it to 30 or more as you wish.
    •  side:  You can decide the location of plugin. By default it shows up towards the bottom right corner of your page. You set it to float to left
    • trigger:  On page load the plugin collapses and as soon as it reaches a specified location it expands. You can choose that location in three ways i.e. onvisible, X% or manual. I prefer locating the trigger point by percentage for better pageviews. The widget will expand as soon as the user scroll downs 40% of your page. You can increase or decrease this value. If you wish that the plugin must expand as soon as the reader reaches the end of your article then instead of pasting the code between the purple lines  paste it just below data:post.body tag and use the value onvisible instead of 40%.
    • The widget will display only on post pages and not on homepage or static pages. To display it on all pages, then simply delete the purple bolded lines.
    Troubleshooting :
    Since Most templates are not well structured and require installation of meta tags to tell Facebook to fetch correct page titles, thumbnails and blog title. To do this simply paste the following code just below <head> tag inside your template
    <meta content='article' property='og:type'/>
    <meta expr:content='data:blog.postImageThumbnailUrl' property='og:image'/>
    <meta expr:content='data:blog.title' property='og:site_name'/>
    <meta expr:content='data:blog.pageName' property='og:title'/>
    <b:if cond='data:blog.metaDescription != &quot;&quot;'>
    <meta expr:content='data:blog.metaDescription' name='description'/>
    </b:if>
    Save your template and now see the plugin if it correctly shows page titles both on your blog and Facebook.

    Your views?

    I hope the installation was not very techy but still if you got into any trouble then just relax and let us know. This widget is extremely important and a must for every blog. We would be adding more updates on it as soon as we hear from Facebook documentation. Do not forget to like this page through the recommendation bar! :) Peace and blessings pals! 

    Sumber:
    http://www.mybloggertricks.com/2012/06/add-facebook-recommendation-bar-to.html

    Author Bio widget untuk Blogger

    Kotak Author mewakili tambahan yang berdampak tinggi untuk posting Anda. Gambar avatar anda, nama, nilai posting, link situs, deskripsi penulis, dan informasi kontak memberikan sentuhan profesional untuk publikasi Anda. Saat ini, kebanyakan blogger memiliki informasi penulis kotak bio baik di bagian atas atau bawah posting blog mereka. Memiliki kotak penulis sangat penting, karena selanjutnya menghubungkan Anda dengan pembaca dengan memberikan sedikit latar belakang tentang Anda.

    Cara membuat background berbeda sesuai kategori

    Cara membuat background berbeda sesuai kategori | Sebenarnya tutorial cara membuat background berbeda pada setiap kategori ini sudah banyak dijelaskan berbagai tutorial blogger. Namun tidak salahnya lagi penulis menguraikan tutorial ini.

    Tujuan membuat background berbeda pada setiap kategori adalah untuk mempercantik tampilan blog, ini sungguh keren bro.., nanti silakan nikmati hasilnya. Oke, kita langsung aja kecara pembuatannya. Tetapi lebih baiknya anda membackup dulu templatenya bro.., untuk antisipasi kalau nanti terjadi kerusakan pada waktu mengedit template, hati-hati bro.., kita akan bermain template. hehhe..... just smileee.....  it's fun. :D

    memasang anchor tag permalink dibawah posting blogger

    Jika posting sebelumnya kita membahas menu breadcrumb yang bisa menampilkan posisi pembaca artikel berdasarkan home, label, dan artikel itu. Sekarang kita memaksimalkan permalink serta judul disetiap posting artikel blog.
    Maksudnya, kita memberi penjelasan kepada pembaca tentang judul, alamat permalink, serta anchor artikel tersebut, trik ini bisa mempengaruhi seo blog kita karena cukup memperkuat keyword kita. Nah cara membuatnya adalah :


    Read more about trick by seoblogger4.blogspot.com

    Jika posting sebelumnya kita membahas menu breadcrumb yang bisa menampilkan posisi pembaca artikel berdasarkan home, label, dan artikel itu. Sekarang kita memaksimalkan permalink serta judul disetiap posting artikel blog.

    Ganti Next - prev navigasi blogspot dengan judul post

    Sobat mungkin sering melihat blog atau website dengan mesin wordpress yang menggunakan navigasi next-prev pager menggunakan judul post sedangkan home tetap. Trik tersebut sangat menarik karena memancing para pembaca dan pengunjung blog untuk melihat artikel sebelum dan sesudah dari post yang sedang dibaca, karena yang tampil adalah judul artikelnya. Trik ganti next-prev pager di blog ini belum terbukti apakah menunjang/mengoptimalkan seo (search engine optimization) blog kita, namun secara logika trik ini cukup berhubungan dengan seo karena jika kita ganti next-previous dengan judul post sesudah dan sebelumnya, lalu visitor ngeklik so bisa dipastikan konversi blog (klik didalam satu blog)akan meningkat dan google sangat serta search engine lain sangat menyukai konversi blog yang bagus.


    1. Setelah login di blogger, pilih rancangan/tata letak kemudian pilih edit template terus centang expang template widget.

    2. Copy script dibawah ini lalu letakkan (paste) di bawah ]]></b:skin>
    <script type="text/javascript" src="http://ajax.googleapis.com/ajax/libs/jquery/1.4.4/jquery.min.js"></script>

    Keterangan: Jika sudah ada script itu di template kamu (biasanya untuk fitur slide) berarti kamu tidak perlu pasang lagi, langsung ketahap ke 3 aje. klik simpan/save.

    3. Pindah ke elemen halaman, klik tambah gadget dan pilih html/javascript, copy paste script dibawah ini:
    <style type="text/css"> 
    #blog-pager-newer-link {font-size:85%;width:200px;text-align:left;} 
    #blog-pager-older-link {font-size:85%;width:200px;text-align:right;} 
    </style> 
    <script type="text/javascript">
    $(document).ready(function(){ 
    var newerLink = $("a.blog-pager-newer-link").attr("href"); 
    $("a.blog-pager-newer-link").load(newerLink+" .post-title:first", function() { 
    var newerLinkTitle = $("a.blog-pager-newer-link").text(); 
    $("a.blog-pager-newer-link").text("<< " + newerLinkTitle); 
    }); 
    var olderLink = $("a.blog-pager-older-link").attr("href"); 
    $("a.blog-pager-older-link").load(olderLink+" .post-title:first", function() { 
    var olderLinkTitle = $("a.blog-pager-older-link").text(); 
    $("a.blog-pager-older-link").text(olderLinkTitle + " >>");//rgt 
    }); 
    }); 
    </script>

    4. Klik save dan navigasi pager blogspot kamu sudah berubah menjadi judul post sebelum dan sesudah artikel yang sedang dibaca.

    5. Enjoy it
    <style type="text/css">
    #blog-pager-newer-link {font-size:85%;width:200px;text-align:left;}
    #blog-pager-older-link {font-size:85%;width:200px;text-align:right;}
    </style>
    <script type="text/javascript">
    $(document).ready(function(){
    var newerLink = $("a.blog-pager-newer-link").attr("href");
    $("a.blog-pager-newer-link").load(newerLink+" .post-title:first", function() {
    var newerLinkTitle = $("a.blog-pager-newer-link").text();
    $("a.blog-pager-newer-link").text("<< " + newerLinkTitle);
    });
    var olderLink = $("a.blog-pager-older-link").attr("href");
    $("a.blog-pager-older-link").load(olderLink+" .post-title:first", function() {
    var olderLinkTitle = $("a.blog-pager-older-link").text();
    $("a.blog-pager-older-link").text(olderLinkTitle + " >>");//rgt
    });
    });
    </script>

    5. Enjoy itSumber :http://seoblogger4.blogspot.com/2011/08/next-prev-navigasi-dengan-judul-post.html#.T84_RIH1DZ5

    Subcribe Me

    Subscribe via RSS Feed If you enjoyed this article just click here, or subscribe to receive more great content just like it.

    Buku Tamu

     
    Support : Your Link | Your Link | Your Link
    Copyright © 2013. HIMA SEJARAH UR - All Rights Reserved
    Template Created by Creating Website Published by Mas Template
    Proudly powered by Blogger